PUT YOUR PARSED ADSENSE CODE HERE
We share Today beautifull most popular Widget For Blogger.this Widget is looking Attractive and easy to how install in blogger.Step by step guide all procedure how install it. We will just add a css code from your blogger HTML editor. So let's jump ahead with the process.
 Note: Before editing your template, it is advisable to have back-up for it.
Step 1. Go to Blogger Dashboard >> Template >> Edit HTML
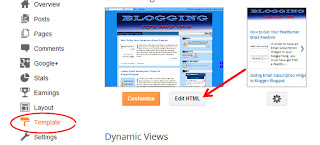
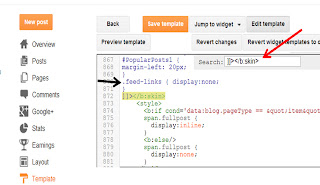
Step 2. Look for ]]></skin> and just before this tag, paste the code below,
Customization (Optional):
You can choose a variety of hexadecimal color here
A. First part (the color of each popular post box).
--- Box no.1-5 the hexadecimal colors are EFF5FB, E0ECF8, CEE3F6, A9D0F5, 81BEF7 respectively. Change these hexadecimal colors with your own likeness.
B. Second part (the with or distance of the box container).
--- Box no.1-5 the width are 95%, 90%, 85%, 80%, and 75% respectively. Increasing the value will increase the width and decreasing the value will also decrease the width.
C. Third part (the circular number tag in each box).You can find the code that control this part at 15th- 17th line of the codes.
--- Change the position (y-axis or vertical ) of the circle that bears the tag by replacing 20px. (Less than 20px, will place it higher and more than 20px will place it in the lower position).
----Change the placement of the circle (x-axis or horizontal) by replacing right to left,
----Change the color of the number inside the circle by replacing black with your own,
D. Fourth part (the Size of the thumbnail)
---- Change the height and width of the thumbnail by replacing 38px,
E. Fifth part (the position or placement of the thumbnail)
----You can place the thumbnail by changing the yellow bold text ( you can replace it with writing right)
Add Numbered Popular Posts Widget In Blogger Blog
Step 1. Go to Blogger Dashboard >> Template >> Edit HTML
#PopularPosts1 ul{margin:0px;padding:5px 0;list-style-type:none}Step 3. Click Preview then save your template and see if it blend with your blog's environment.
#PopularPosts1 ul li{position:relative;margin:5px 0;padding:3px}
#PopularPosts1 ul li:first-child{background:#EFF5FB;width:95%}
#PopularPosts1 ul li:first-child:after{content:"1"}
#PopularPosts1 ul li:first-child + li{background:#E0ECF8;width:90%}
#PopularPosts1 ul li:first-child + li:after{content:"2"}
#PopularPosts1 ul li:first-child + li + li{background:#CEE3F6;width:85%}
#PopularPosts1 ul li:first-child + li + li:after{content:"3"}
#PopularPosts1 ul li:first-child + li + li + li{background:#A9D0F5;width:80%}
#PopularPosts1 ul li:first-child + li + li + li:after{content:"4"}
#PopularPosts1 ul li:first-child + li + li + li + li{background:#81BEF7;width:75%}
#PopularPosts1 ul li:first-child + li + li + li + li:after{content:"5"}
#PopularPosts1 ul li:first-child:after,#PopularPosts1 ul li:first-child + li:after,#PopularPosts1 ul li:first-child + li + li:after,#PopularPosts1 ul li:first-child + li + li + li:after,#PopularPosts1 ul li:first-child + li + li + li + li:after{position:absolute;top:20px;right:-15px;border-radius:50%;background:#fff; border: 1px dotted #353535; width:20px;height:20px;line-height:1em;text-align:center;font-size:17px;color:black;}
#PopularPosts1 ul li a{font-size:12px;color:#444;text-decoration:none}
#PopularPosts1 ul li a:hover{color:#222;text-decoration:none}
#PopularPosts1 {
margin-left: 20px;
}
.PopularPosts img {
padding-right:.4em; height: 38px; width: 38px;
}
#PopularPosts1 ul li .item-thumbnail {
float: left; border: 0; margin-right: 10px; background: transparent; padding: 0;
}
Customization (Optional):
You can choose a variety of hexadecimal color here
A. First part (the color of each popular post box).
--- Box no.1-5 the hexadecimal colors are EFF5FB, E0ECF8, CEE3F6, A9D0F5, 81BEF7 respectively. Change these hexadecimal colors with your own likeness.
B. Second part (the with or distance of the box container).
--- Box no.1-5 the width are 95%, 90%, 85%, 80%, and 75% respectively. Increasing the value will increase the width and decreasing the value will also decrease the width.
C. Third part (the circular number tag in each box).You can find the code that control this part at 15th- 17th line of the codes.
--- Change the position (y-axis or vertical ) of the circle that bears the tag by replacing 20px. (Less than 20px, will place it higher and more than 20px will place it in the lower position).
----Change the placement of the circle (x-axis or horizontal) by replacing right to left,
----Change the color of the number inside the circle by replacing black with your own,
D. Fourth part (the Size of the thumbnail)
---- Change the height and width of the thumbnail by replacing 38px,
E. Fifth part (the position or placement of the thumbnail)
----You can place the thumbnail by changing the yellow bold text ( you can replace it with writing right)
|
|
|
|
Get Free Email Updates Daily! |
Follow us! 


|


0 comments : Post Yours! Read Comment Policy ▼
PLEASE NOTE:
We have Zero Tolerance to Spam. Chessy Comments and Comments with Links will be deleted immediately upon our review.
Post a Comment
Your feedback is always appreciated. We will try to reply to your queries as soon as time allows.
Note:
1. To add HTML CODE in comments then please use our HTML Encoder
2. You can always Test the tutorial on our HTML Editor
3. Please do not spam Spam comments will be deleted immediately upon our review.
Regards,
Imtiaz Ahmed