Showing posts with label CSS Widget. Show all posts

Friday, 25 October 2013

jquery Stylish smooth scroll back to top widget for blogger

Posted By : Unknown | Friday, 25 October 2013 1 Comment so far
jquery Stylish smooth scroll back to top widget for blogger
jquery Stylish smooth scroll back to top widget for blogger 
This tutorial I will sow how to add a smooth jquery scroll back to top widget to your blogger blog.  You can make your blog more users friendly by using this widget, because this scroll to top widget helps your blog reader to go top of your blog with a smooth scrolling. This widget scrolling effect is looks attractive. This widget is designed without any image. To know how is this widget sees our screenshot below or you can see this widget is working on my blog footer. 


How to  add this widget to your blogger blog?

I presented this tutorial with some simple steps so, to add this widget just follow my simple instruction bellow.
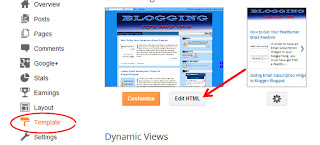
  • Access www.blogger.com>> Locate your Blog >> dashboard >> Template >> Edit HTML
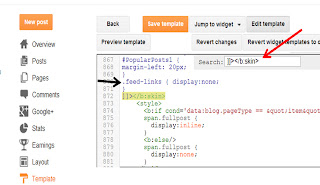
  • Search for </body> tag
  • Add below codes before </body> ta
<style type='text/css'>
#MBB {-moz-border-radius: 5px;-webkit-border-radius: 5px;border-radius: 5px; width:96px;background-color: #EEEEEE;background-color:#FFD45D;filter: progid:DXImageTransform.Microsoft.gradient(startColorStr=&#39;#99EEEEEE&#39;,EndColorStr=&#39;#99EEEEEE&#39;);text-align:center;padding:5px;position:fixed;bottom:51px;right:29px;cursor:pointer;color:#111;text-decoration:none;border:1px solid #C9C9C9;}
</style>
<script src='https://ajax.googleapis.com/ajax/libs/jquery/1.5.1/jquery.min.js' type='text/javascript'/>
<script type='text/javascript'>
$(function() {
    $.fn.scrollToTop = function() {
    $(this).hide().removeAttr(&quot;href&quot;);
    if ($(window).scrollTop() != &quot;0&quot;) {
        $(this).fadeIn(&quot;slow&quot;)
    }
    var scrollDiv = $(this);
    $(window).scroll(function() {
        if ($(window).scrollTop() == &quot;0&quot;) {
        $(scrollDiv).fadeOut(&quot;slow&quot;)
        } else {
        $(scrollDiv).fadeIn(&quot;slow&quot;)
        }
    });
    $(this).click(function() {
        $(&quot;html, body&quot;).animate({
        scrollTop: 0
        }, &quot;slow&quot;)
    })
    }
});
$(function() {
    $(&quot;#MBB&quot;).scrollToTop();
});
</script>
<a href='#' id='MBB' style='display:none;'>Scroll to Top </a>
  • Save your Template
  • You Are Successfully Done!
Now You Will See Floating Smooth scroll back to top Button In Your Blog. 
Enjoy It! and Leave your Comments and Responses with us.


Tuesday, 15 October 2013

Add New Stylished Popular Posts Widget In Blogger Blog

Posted By : Unknown | Tuesday, 15 October 2013 first to comment!
We share Today beautifull most popular Widget For Blogger.this Widget is looking Attractive and easy to how install in blogger.Step by step guide all procedure how install it. We will just add a css code from your blogger HTML editor. So let's jump ahead with the process.
Adding Beautiful Stylistic Cascading Popular Post Widget

Add Numbered Popular Posts Widget In Blogger Blog

Note: Before editing your template, it is advisable to have back-up for it.

Step 1. Go to Blogger Dashboard >> Template >> Edit HTML

customizing popular post widget

Step 2. Look for ]]></skin> and just before this tag, paste the code below,

customizing popular post widget

#PopularPosts1 ul{margin:0px;padding:5px 0;list-style-type:none}
#PopularPosts1 ul li{position:relative;margin:5px 0;padding:3px}
#PopularPosts1 ul li:first-child{background:#EFF5FB;width:95%}
#PopularPosts1 ul li:first-child:after{content:"1"}
#PopularPosts1 ul li:first-child + li{background:#E0ECF8;width:90%}
#PopularPosts1 ul li:first-child + li:after{content:"2"}
#PopularPosts1 ul li:first-child + li + li{background:#CEE3F6;width:85%}
#PopularPosts1 ul li:first-child + li + li:after{content:"3"}
#PopularPosts1 ul li:first-child + li + li + li{background:#A9D0F5;width:80%}
#PopularPosts1 ul li:first-child + li + li + li:after{content:"4"}
#PopularPosts1 ul li:first-child + li + li + li + li{background:#81BEF7;width:75%}
#PopularPosts1 ul li:first-child + li + li + li + li:after{content:"5"}
#PopularPosts1 ul li:first-child:after,#PopularPosts1 ul li:first-child + li:after,#PopularPosts1 ul li:first-child + li + li:after,#PopularPosts1 ul li:first-child + li + li + li:after,#PopularPosts1 ul li:first-child + li + li + li + li:after{position:absolute;top:20px;right:-15px;border-radius:50%;background:#fff; border: 1px dotted #353535; width:20px;height:20px;line-height:1em;text-align:center;font-size:17px;color:black;}
#PopularPosts1 ul li a{font-size:12px;color:#444;text-decoration:none}
#PopularPosts1 ul li a:hover{color:#222;text-decoration:none}
#PopularPosts1 {
margin-left: 20px;
}
.PopularPosts img {
padding-right:.4em; height: 38px; width: 38px;
}
#PopularPosts1 ul li .item-thumbnail {
float: left; border: 0; margin-right: 10px; background: transparent; padding: 0;
}
Step 3. Click Preview then save your template  and see if it blend with your  blog's environment.

Customization (Optional):
You can choose a variety of hexadecimal color here
A. First part (the color of each popular post box).
    --- Box no.1-5 the hexadecimal colors are  EFF5FBE0ECF8, CEE3F6, A9D0F5, 81BEF7 respectively. Change these hexadecimal colors with your own likeness.

B. Second part (the with or distance of the box container).
   --- Box no.1-5 the width are 95%, 90%, 85%, 80%, and 75% respectively. Increasing the value will increase the width and decreasing the value will also decrease the width.

C. Third part (the circular  number tag in each box).You can find the code that control this part at 15th- 17th line of the codes.
  --- Change the position (y-axis or vertical ) of the circle that bears the tag by replacing 20px. (Less than 20px, will place it higher and more than 20px will place it in the lower position).
----Change the placement of the circle (x-axis or horizontal) by replacing right to left,
----Change the color of the number inside the circle by replacing black with your own,

D.  Fourth part (the Size of the thumbnail)
---- Change the height and width of the thumbnail by replacing 38px,

E. Fifth part (the position or placement  of the thumbnail)
----You can place the thumbnail by changing the yellow bold text ( you can replace it with writing right)


Thursday, 1 August 2013

How To Change New Stylish ScrollBar On Blogger/Blog

Posted By : Unknown | Thursday, 1 August 2013 first to comment!
Add an Stylish Scrollbar
Every one like diffrent thing when you add on your blogger and website. Scrollbar is displayed on right side on blogger and below. When you change you blogger ScrollBar its looking attractive. Scroolbar is help for visitors to scroll down ScrollBar. when visitor look your ScrollBar impress and really like it.all procedure given below how we can add this ScrollBar  in blogger template.some time we have no idea how install it.because this widget is CSS stylish ScrollBar .install this Widget in Blogger Template and looking attractive your template.
One of them is taken with default scrolling bar and other one is taken with scrolling script.

How install ScrollBar Widget On Blogger/Blog

How To Change New Stylish ScrollBar On Blogger/Blog
  • Go to Blogger Dashboard.
  • Go to >> Template >> Edit HTML.
  • Find Using CTRL+F  This Code ]]> 
  • Copy Below Given Code and Paste Above it.
/* Getmytricksfree */
::-webkit-scrollbar {
background:#fff;
width:10px;
}
::-webkit-scrollbar-thumb {
-webkit-box-shadow: inset 0 0 6px rgba(0, 0, 0, 0.5);
background-image: -webkit-linear-gradient(top, #336699 10%, #336699 51%);
}
::-webkit-scrollbar-track {
}

Now Friends You Are all done next refresh your blogger address and you can see your ScrollBar looking Good.


  • Tips And Tricks
  • Template
  • Make Money
  • Widget
  • Sitemap
  • Back To Top